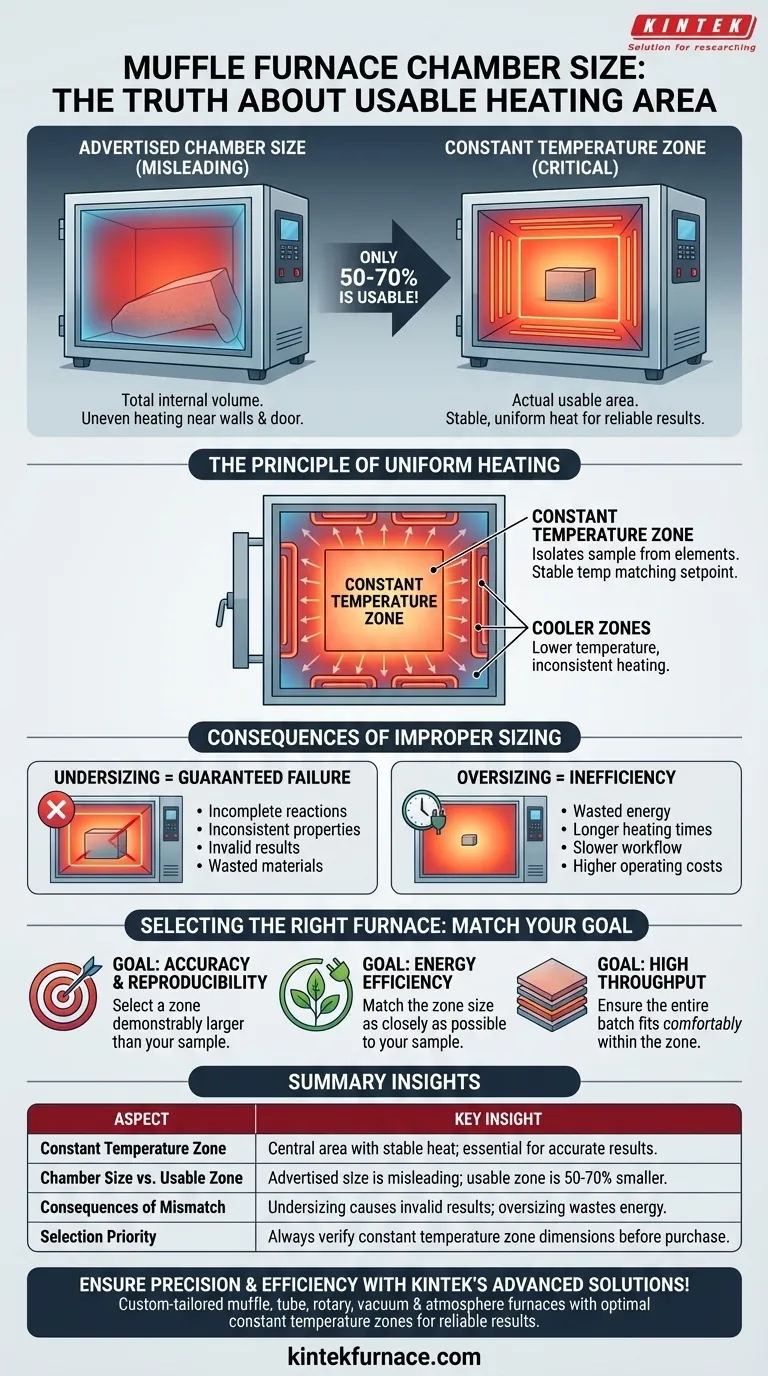
When selecting a muffle furnace, the listed chamber size can be misleading. The most important dimension is the constant temperature zone, an area within the chamber that is always smaller than the total volume. For your process to be accurate, your sample or material must fit entirely inside this specific zone to ensure it receives uniform, consistent heat.
The advertised chamber size of a muffle furnace does not represent its usable heating area. The true measure of capacity is the "constant temperature zone," and placing samples outside this zone will result in uneven heating and fundamentally unreliable results.
Beyond Volume: The Principle of Uniform Heating
A muffle furnace is designed for one primary purpose: to provide a safe, precise, and contamination-free environment for high-temperature work. Understanding how it achieves this is key to selecting the right model.
What is a Constant Temperature Zone?
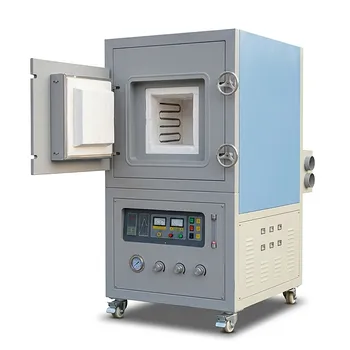
The insulated chamber of a muffle furnace isolates your sample from direct contact with the heating elements. However, heat is not perfectly uniform across the entire chamber; areas near the walls and door are inherently cooler than the center.
The constant temperature zone is the central volume where the temperature is stable, uniform, and matches the controller's setpoint. This is the only area where you can achieve reliable and reproducible thermal processing.
Why Chamber Size is Deceptive
Manufacturers list the total internal dimensions of the chamber. However, the usable constant temperature zone might only be 50-70% of that volume.
Thinking of the chamber size as the usable workspace is a common mistake that leads to process failure. The larger the furnace, the more significant the difference between its total volume and its effective heating zone.
The Consequences of Improper Sizing
If any part of your sample extends beyond the constant temperature zone, it will be subjected to a lower temperature than intended.
This leads to critical failures, such as incomplete ash analysis, inconsistent material properties in heat treatment, or failed synthesis in materials science research. The result is wasted time, materials, and a loss of confidence in your data.
Understanding the Trade-offs
Choosing a furnace isn't just about finding one that's "big enough." Both undersizing and oversizing come with significant penalties that impact accuracy, efficiency, and safety.
Undersizing Guarantees Failure
This is the most critical mistake. If your sample is too large for the constant temperature zone, your results will be invalid. There is no workaround for this; you simply need a furnace with a larger effective heating zone.
Oversizing Creates Inefficiency
Using a very large furnace for a small sample wastes significant energy and time. The furnace will consume more power and take longer to reach its target temperature, slowing down your lab's workflow.
Insulation and Lab Environment
A larger chamber requires more robust and high-quality insulation to operate efficiently. Poor insulation on any furnace leads to thermal energy waste and can dangerously increase the ambient temperature of your laboratory, affecting users and other sensitive equipment.
How to Apply This to Your Goal
Before purchasing, you must verify the dimensions of the constant temperature zone, not just the chamber. Ask the manufacturer for this specific data.
- If your primary focus is process accuracy and reproducibility: Always select a furnace whose specified constant temperature zone is demonstrably larger than your sample dimensions.
- If your primary focus is energy efficiency: Match the constant temperature zone to your typical sample size as closely as possible to avoid the energy waste associated with an oversized chamber.
- If your primary focus is high throughput: Ensure all samples in a batch can fit comfortably within the constant temperature zone, leaving adequate space between them for uniform heat circulation.
By prioritizing the constant temperature zone over the advertised chamber size, you ensure your high-temperature processes are built on a foundation of precision and reliability.
Summary Table:
| Aspect | Key Insight |
|---|---|
| Constant Temperature Zone | Central area with stable, uniform heat; essential for accurate results. |
| Chamber Size vs. Usable Zone | Advertised size is misleading; usable zone is 50-70% smaller. |
| Consequences of Mismatch | Undersizing causes invalid results; oversizing wastes energy and time. |
| Selection Priority | Always verify constant temperature zone dimensions before purchase. |
Ensure your lab's precision and efficiency with KINTEK's advanced high-temperature furnace solutions! Leveraging exceptional R&D and in-house manufacturing, we provide diverse laboratories with muffle, tube, rotary, vacuum & atmosphere furnaces, and CVD/PECVD systems. Our strong deep customization capability tailors each solution to your unique experimental needs, guaranteeing optimal constant temperature zones for reliable results. Don't let improper sizing compromise your work—contact us today to discuss how we can enhance your thermal processes!
Visual Guide
Related Products
- 1400℃ Muffle Oven Furnace for Laboratory
- 1700℃ High Temperature Muffle Oven Furnace for Laboratory
- 1800℃ High Temperature Muffle Oven Furnace for Laboratory
- 1200℃ Muffle Oven Furnace for Laboratory
- High Temperature Muffle Oven Furnace for Laboratory Debinding and Pre Sintering
People Also Ask
- What role does a laboratory high-temperature muffle furnace play in the treatment of highly contaminated waste glass?
- How is a laboratory high-temperature muffle furnace utilized to achieve the specific crystalline structure of LaFeO3 catalysts?
- Function of Muffle Furnace in Exfoliating g-C3N4 Nanosheets: Precision Thermal Control and Defect Engineering
- What function does a muffle furnace perform in perovskite formation? Optimize Your Thermal Synthesis
- How is a laboratory muffle furnace used in 3D-printed PP-CF cross-linking? Achieve Thermal Stability at 150 °C