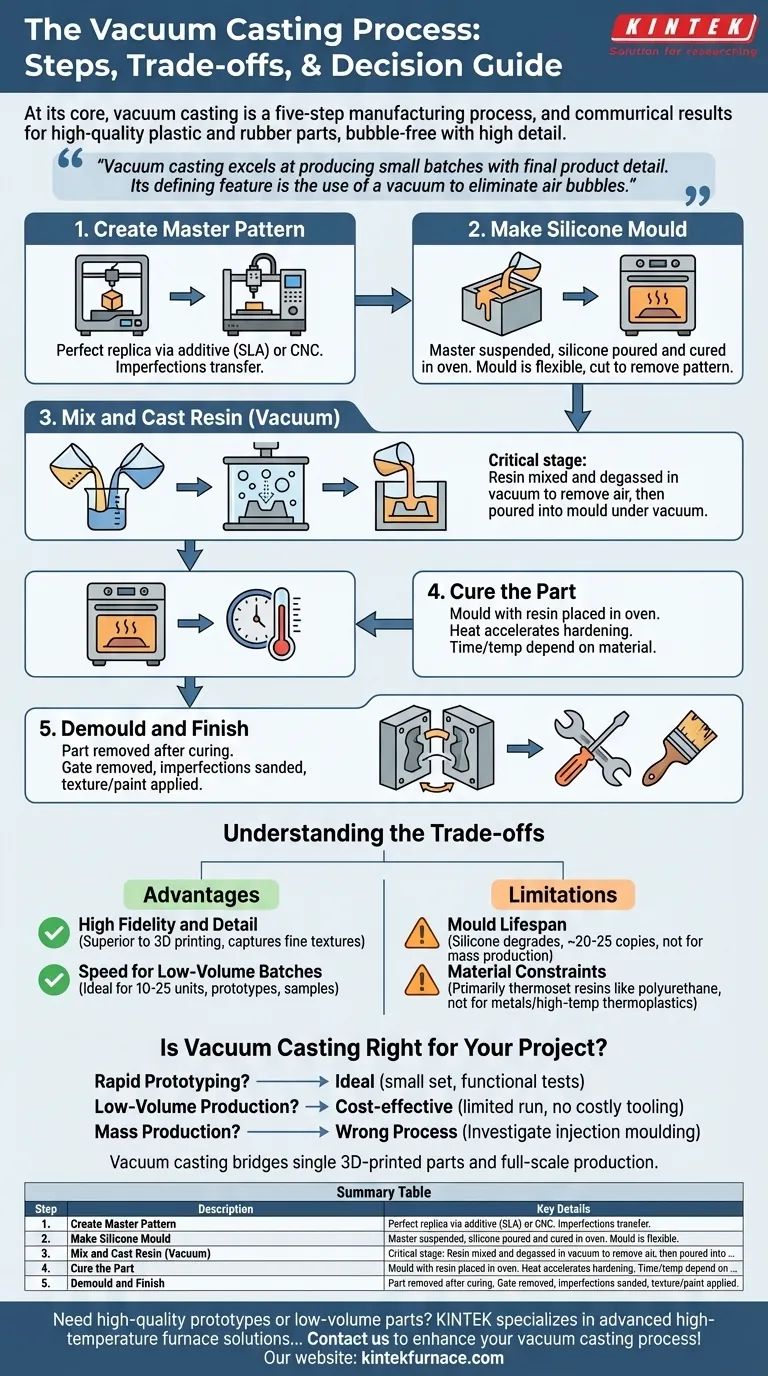
At its core, vacuum casting is a five-step manufacturing process used to create high-quality plastic and rubber parts. It begins with a master pattern, which is used to create a flexible silicone mould. Liquid polyurethane resins are then mixed and poured into this mould under a vacuum to eliminate air bubbles, resulting in a bubble-free, highly detailed final part after curing.
Vacuum casting excels at producing small batches of parts with the detail and finish of a final product. Its defining feature is the use of a vacuum to ensure the casting material perfectly fills the intricate features of a soft silicone mould, avoiding defects caused by trapped air.

A Step-by-Step Guide to the Vacuum Casting Process
Understanding each stage reveals why this method is valued for its precision and speed in low-volume scenarios. The quality of the final part is directly dependent on the execution of each step.
Step 1: Create the Master Pattern
The entire process begins with a single, high-quality master pattern. This is a perfect physical replica of the final part you wish to create.
This pattern is typically produced using additive manufacturing (like SLA 3D printing) for complex geometries or CNC machining for simpler shapes requiring high precision. Any imperfection on the master pattern will be transferred to the mould and every subsequent part.
Step 2: Make the Silicone Mould
The master pattern is suspended inside a casting box, and liquid silicone is poured around it. The box is then placed in an oven to cure the silicone into a solid, flexible block.
Once cured, the mould is carefully cut in half, and the master pattern is removed. This leaves a hollow cavity that is an exact negative impression of the original part. The mould's flexibility is key to allowing for the removal of parts with complex features and undercuts.
Step 3: Mix and Cast the Resin
This is the most critical stage and where the "vacuum" comes into play. Two-part liquid casting resins, typically polyurethanes, are mixed together.
This mixture is placed inside a vacuum chamber to degas it, which violently removes all dissolved air bubbles. The silicone mould is also placed in the chamber, and the degassed resin is poured into it. The vacuum ensures the resin flows into every tiny crevice of the mould without trapping any air.
Step 4: Cure the Part
After the mould is filled, it is removed from the vacuum chamber and placed into a curing oven. The heat accelerates the chemical reaction of the resin, causing it to harden into a solid plastic part.
The curing time and temperature are specific to the chosen resin material and the part's thickness.
Step 5: Demould and Finish
Once the resin has fully cured, the flexible silicone mould is opened, and the newly formed part is carefully removed.
From here, minor finishing touches can be applied. This may include removing the gate (where the resin was poured in), sanding any minor imperfections, or applying paint and textures to match final product specifications.
Understanding the Trade-offs
Vacuum casting is an excellent tool for specific applications, but it is not a universal solution. Understanding its advantages and limitations is key to using it effectively.
Advantage: High Fidelity and Detail
The combination of liquid resin and a vacuum environment allows the material to capture extremely fine details, textures, and sharp edges from the master pattern. It produces parts with a surface finish that is often superior to 3D printing.
Advantage: Speed for Low-Volume Batches
Once the master pattern and mould are created, producing copies is relatively fast. This makes it an ideal process for creating 10-25 units for prototypes, user testing, or marketing samples far more quickly than creating tooling for injection moulding.
Limitation: Mould Lifespan
Silicone moulds are not permanent. They degrade with each casting cycle due to the chemical and thermal stress. A typical mould can produce around 20 to 25 copies before it loses its detail and must be discarded. This makes vacuum casting uneconomical for mass production.
Limitation: Material Constraints
The process is primarily designed for thermoset resins like polyurethanes, which mimic the properties of production plastics like ABS, nylon, or rubber. It cannot be used for casting metals or high-performance thermoplastics that require extreme temperatures.
Is Vacuum Casting Right for Your Project?
Use this guide to determine if the process aligns with your goals.
- If your primary focus is rapid prototyping: Vacuum casting is ideal for creating a small set of highly realistic, functional prototypes for fit, form, and function testing.
- If your primary focus is low-volume production: This is a cost-effective method to produce a limited run of end-use parts without the massive upfront investment of injection mould tooling.
- If your primary focus is mass production: This is the wrong process. You should investigate technologies like injection moulding that are designed for high-volume manufacturing.
Ultimately, vacuum casting serves as a critical bridge between a single 3D-printed part and full-scale production.
Summary Table:
| Step | Description | Key Details |
|---|---|---|
| 1. Create Master Pattern | Produce a perfect replica of the final part. | Uses additive manufacturing (e.g., SLA 3D printing) or CNC machining. |
| 2. Make Silicone Mould | Create a flexible mould from the master pattern. | Cured in an oven; allows removal of complex parts. |
| 3. Mix and Cast Resin | Degas and pour resin under vacuum to eliminate air bubbles. | Uses polyurethane resins; ensures detailed filling. |
| 4. Cure the Part | Harden the resin in a curing oven. | Time and temperature depend on resin and part thickness. |
| 5. Demould and Finish | Remove part and apply final touches. | Includes gating removal, sanding, or painting. |
Need high-quality prototypes or low-volume parts with exceptional detail? KINTEK specializes in advanced high-temperature furnace solutions, including Muffle, Tube, Rotary, Vacuum & Atmosphere Furnaces, and CVD/PECVD Systems. With our strong R&D and in-house manufacturing, we offer deep customization to meet your unique experimental needs. Contact us today to discuss how our solutions can enhance your vacuum casting process and deliver superior results for your laboratory!
Visual Guide